Tuesday, January 31, 2017

My Favorite Photo-Editing Apps

If you're follow any famous bloggers on social media, you've probably seen #AColorStory floating around Instagram and Pinterest. The sisters behind the blog "A Beautiful Mess" created A Color Story app to edit photos for stronger colors and brighter whites. I was really excited about the app initially, but after using it for a few days, I decided it wasn't for me. There's very few "free" features and the interface is really confusing and hard to use. I realized that I already have several photo apps that do exactly what I need, so I thought I would share them with you.

Below is a list of my favorite photo apps and all their pros and cons. I've included screenshots of each of the apps in progress so you can get an idea of how it really feels to use them.

Google Photos

After going through 3 different phones in 9 months, I was frustrated by the lack of accessibility I had to photos from my old devices. I wised up and downloaded the Google Photos app, and I've been grateful ever since! Here's what you need to know:

PROS:
Totally free
Unlimited storage
Works on desktop, mobile, and tablets
Automatically uploads photos and videos
(I even have mine set to delete photos from my phone after they're backed up, which is great because I never get notifications saying "There is not enough storage to take a photo" or anything like that.)
Easy to make collections and albums of your photos
Easy to share with anybody on Gmail

CONS:
Google sees all my photos and probably uses that information to advertise to me
Photos are compressed (I'm super picky about bad quality photos and the compression doesn't bother me at all, even when I print my photos, but it's still a con).
The app can run slowly when you want to access photos from 2013 or something


Pic-Tap-Go

This app is $1.99 on the iTunes store, so even though it's not free, it's a great deal because it unlocks EVERYTHING for you. Pic-Tap-Go is my number one recommendation for editing photos because it's so easy to use. I like that you don't have to actually apply the filters to see how they will change your photo. The app gives you a little sample preview, which is great. Here's the other details:

CONS:
Not free
Can’t make general photo adjustments like sharpness, brightness, or saturation
oesn't do a lot for portrait photos, this app works best for product/nature photography

PROS:
Cheap
No advertisements
Extremely easy to use
Easy to undo actions
Variety of filters
Ability to adjust the strength of filters
Ability to add filters on top of each other
Save your "recipe" so all your photos can have the same style (I love this feature)
Easy to save your photos from the app


Aviary

This app is a great resource for anyone who wants to edit their photos Instagram-style. The interface is a little funky but it's relatively simple to use, especially considering how many features there are. Here's everything else you need to know:

CONS:
Some ads
The app can be kind of glitchy
Can't undo actions
Confusing interface

PROS:
Free!
Lots of features
Pretty easy to use
Ability to adjust the strength of filters
Easy to save your photos from the app


InstaReady

As much as I hate to admit it, sometimes I edit my photos to make myself look prettier. For photo retouching, this app does it all. You can soften the photo (give yourself that glowing look), slim your face, make your eyes bigger, anything! I try to use all the effects sparingly because I don’t want to look like something I'm not, but it's nice to know that I can look decent in any picture.

CONS:
Lots of ads
Only works for retouching. There aren't any filters or adjustments available.
Large file size (takes up a lot of storage on my iPhone)

PROS:
It really works! Obviously the retouching can be overdone, but the app does what it's supposed to and I think it looks good!
Fairly easy to use
Automatically saves pictures to your camera roll when you're finished
Easy to see what you've done and compare it to the original picture

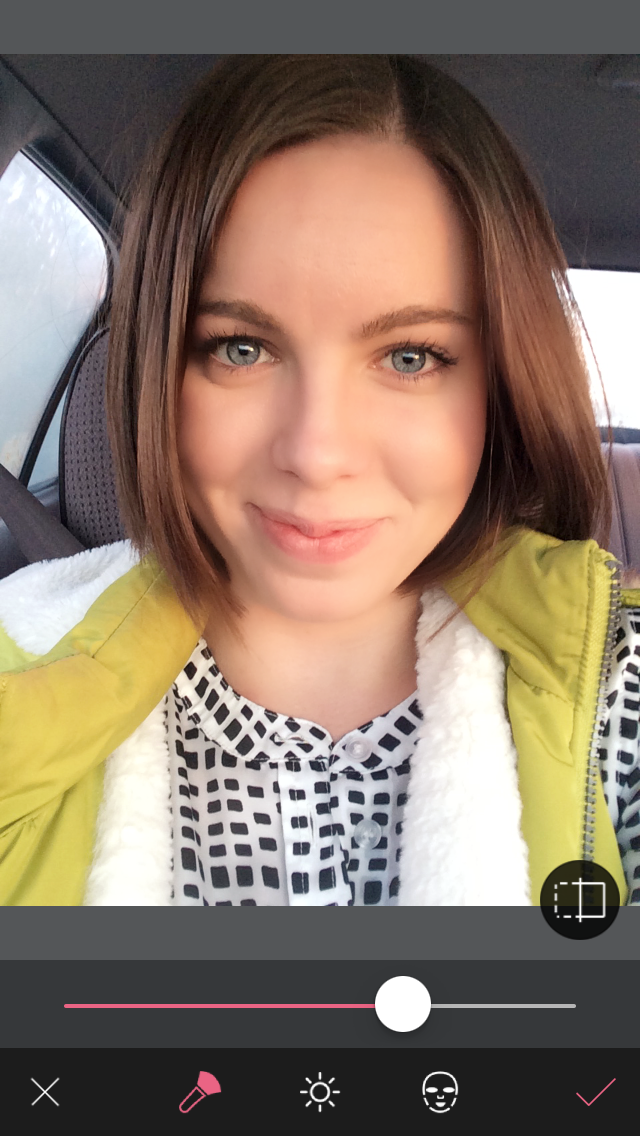


Note: I've heard really great things about the app FaceTune for photo retouching and brightening photos, but it's $3.99 so I haven't purchased it yet.

I hope this is a helpful guide for anyone who's interested in improving the quality of their photos. Obviously, not every picture needs to be edited in all (or any) of these programs, but they do offer some amazing services for very little cost. If you know of any other cost effective, easy-to-use photo apps, I'd love to hear about them!


Thanks for reading!

Rebecca

Saturday, January 21, 2017

My Secret Method for Organizing Creative Projects

For many creative professionals, organization is a skill they lack. I used to get really frustrated working on group projects in college because there were certain designers and writers who couldn't seem to get anything done on time. I don't mean to call out anyone for being disorganized, but I DO want to discourage people from using"creativity" as a excuse for laziness. Creativity and organization are skills that must be developed equally for maximum success. Since I've talked a lot about creativity recently, I thought I would share my no-nonsense advice for getting (and staying!) organized with creative work.

1. Set Firm Deadlines

I think many creative people don't realize how long something is going to take them. This is something I have struggled with in the past, so I designed a simple system for getting big projects done. I like to get a calendar (weekly or monthly, depending on the task), and schedule everything backwards. For example, my schedule might look like this:

February 20: Turn in final brochure
February 18: Pick up printed brochures from Alphagraphics
February 12: Submit brochure design to Alphagraphics
February 10: Submit brochure to editor for proofreading, etc.
February 9: Make final changes to brochure design and match colors
February 4: Add photos and copy to brochure
February 1: Make brochure design outline/rough draft

You get the idea. This system helps me work faster, avoid procrastinating, and keeps me on track because I have more time to adjust the plan if something takes longer than I originally anticipated.

2. Keep track of your time

When I do contract or freelance work, I keep track of my time very carefully. I like to do this with all my projects so I can manage my time more effectively. Keeping track of my time helps me A. work faster (because I don't want to have to tell a client I spent an hour making a rough draft), and B. understand how long something actually takes. I used to underestimate my time for clients because I didn't really have a good idea of what goes into certain tasks. Keeping track of my time allows me to say with confidence, "I can have that done in __ hours" instead of making a wild guess and then going crazy to make sure it happens.

2. Be Accountable

If you're the creative person on a project, make a small goal for yourself and then tell someone on your team so they can force you to act on it. Just say, "I'm going to make an outline for the poster in B&W in the next 30 minutes and bring it to you for proofreading." You'll be surprised how fast you can work when you have someone really counting on you!

3. Make Outlines

Oftentimes, we get excited about projects and want to dive right in without really getting organized. Take the time to make a rough draft, outline your goals, and draw your ideas out on paper before you go crazy in Photoshop and make a 100MB file with 50 layer masks that can't be compressed (yes, this has actually happened to me). Make sure you really know what you're doing before you start, and you won't waste as much time trying to figure it out.

Organizing is what you do before you do something, so when you do it, it's not all mixed up.
A. A. Milne

4. Just Do It!

My sister, Abby is a professional writer/editor and she says the secret to writing is, "Just keep your butt in the chair." I love that idea! Sometimes you have to force creativity (Read Twyla Tharp's The Creative Habit if you're interested in learning more about this) by sitting down and working it out. I find that if I can set a timer for 30 minutes and work without stopping, I often accomplish more than if I sat down for several hours without any focus. Remember that it's better to submit something ugly to your partner than nothing at all.

I know that creative projects can't always be systemized, but I have found that if you can get organized and stay focused, you'll work a lot faster and you won't suffer from so much burnout. Even though there are professional positions to manage creative people (account managers, marketing coordinators, etc.) I think we should all be a little more responsible and do what we said we would do, when we said we would do it. You can be creative and organized, and everyone (especially your group partners) will thank you for it.


Thanks for reading!

♡♡♡
Rebecca

Sunday, January 15, 2017

The Easiest Time Management System EVER!

When my life feels out-of-control and insanely crazy busy, this is the system I use to clear my head and really get stuff done. (I’ve actually been using it for the last few weeks, which is what inspired this post!) It’s not anything special, but I have found that it really works, and it doesn’t require any fancy planners or timers or apps. I made up this method myself, but it’s based partially on the Stephen R. Covey method of prioritizing and it’s also based on an object lesson I had at church when I was twelve or thirteen. You've probably seen it, too. You start out with an empty jar. This represents your day. Then you have a bag of big rocks and a bag of sand. If you put the sand in the jar first, there's not enough room for the big rocks. But when you put the rocks in first, and there’s plenty of room for all the sand, and then some.

I like to think of the rocks as the “Big Stuff” in my day and the sand as just some “Things to Do.” When you separate them, you can manage your time much more effectively.
HOW IT WORKS

You get a piece of paper and divide it in half. One the left side you write “Things I HAVE TO DO Today.” On the right side, you write “Things I WOULD LIKE TO DO Today.” Then you list all your tasks in the appropriate spot. The left side represents the big rocks and the right side represents the sand. If you focus on the rocks first, the sand can just fill in the cracks. I like to do this for an entire week, but I do it one day at a time.

I try to be really strict with myself. The “HAVE TO DO” list is usually full of appointments, events, phone calls, and meetings that will happen whether or not I even show up. If there’s something that doesn’t have to be done today, I put it on the right side. That way you really see how much spare time you have. The right side has things that I want to get done, but maybe aren't time-sensitive or don't have anybody waiting on them. Only you can really decide what goes where. I used to always list Grocery Shopping on the “WOULD LIKE TO DO” list, but I realized that if I didn’t make it a priority, it would never happen! So be smart about how you organize your sections.

Here’s a picture of my list from last week:


I don’t do any prioritizing or color-coding once my list is made. Dividing the projects into two categories automatically prioritizes them for me--the “Big Stuff” has to be done first. I do like to list the tasks on the “HAVE TO DO” side by time, just so I have a little schedule for my day.

I know time-management can be overwhelming and scary, but I think learning to use our time effectively can be really fun! I’m always amazed at what I can get done when I put my mind to it. This system really only works for one day or one week at a time. It won't help you reach your long-term goals or plan a vacation, so be aware of that.

I made an editable template of the schedule I use for this system so I don't have to write out "Things I HAVE TO DO" every time I want to get organized. The template has "Big Stuff" on the left and "Things To Do" on the right, and it's displayed as an entire week. There's also a cute quote at the bottom because that's just how I like things. Take a look at the schedule and if you're interested, download it below.


Thanks for reading!

Rebecca

Sunday, January 1, 2017

Rebecca's Guide to Goal-Setting

If you're like me, you are probably looking forward to the new year as an opportunity to evaluate your life and make some new goals. I love thinking about my goals and what I want to accomplish. I don't think it's really necessary to write an in-depth article about setting goals because there's already so much good information out there. I believe one of the best ways to learn is by finding good role models and following them.

These are my favorite goal-setting role models and resources:

1. Zen Habits A Simple Guide to Setting and Achieving Your Life Goals http://zenhabits.net/a-simple-guide-to-setting-and-achieving-your-life-goals/
2. Harvard Business Review Making Your Work Resolutions Stick https://hbr.org/2014/12/make-your-work-resolutions-stick
3. The Happy Manager Elementary Goal Setting - Make It Up and Make it Happen! http://www.the-happy-manager.com/articles/elementary-goal-setting/
4. Stephen R. Covey Start Small with Goal Setting http://www.stephencovey.com/blog/?cat=46

Here's a copy of Stephen R. Covey's instructions from several years ago.
Start Small with Your Resolutions for 2010
The start of a New Year is always special. There is a feeling of renewal as we look to a new year, a new beginning and there is a sense of excitement for making changes or adopting new habits. However, do you ever find yourself making New Year’s resolutions only to abandon them? If you do, you are not alone. I want you to be successful at one goal, only one goal this year—and that is accomplishing one small goal you know you can accomplish. I say start small so you can build the confidence and strength to do more. It’s all about taking what I call “baby steps.” Start small, keep at it, and stay consistent until you’re ready pick up the pace. I also suggest that you work on your goal on a weekly basis. For instance, if you are setting a goal to reduce your sugar intake, set a goal to reduce the number of sugar-rich drinks you consume during the week. If you are in the habit of drinking soda pop everyday or several times a week, decide at the beginning of the week how many drinks you will reduce in your diet. If you go too fast and eliminate all your drinks, you may just fail at it because you are not emotionally, mentally or physically prepared to do so. So start small. Make a promise and keep it…make a promise and keep it. And soon you will enlarge your strength, confidence and capabilities to discipline yourself to achieve other goals. Many years ago, I went on a sugar fast with a group of students. You can’t believe how difficult it was at first but as we achieved small victories, our will power and passion for achieving our goal became stronger and stronger. We actually found strength in saying “no” to sugar because we felt an inner strength, a strength that inspired us to grow our confidence and abilities to grow our character, our sense of who we wanted to be. As you set your small goal, you may want to enlist the help of someone close to you. It’s important to have some support, encouragement and a system of accountability. You might even invite this person to set a small goal that you can encourage them on. Work together and create synergy to help each other. I wish you well on your journey in 2010. You have the potential for greatness in you! Go for it! Start small. Make a promise and keep it.
I love that. I like hearing from Stephen R. Covey and other people who really know how to achieve their goals. These people accomplish major things and they all recommend the same stuff:
  • Set short-term and long-term goals
  • Make little, tiny "baby steps" to help you reach your goals
  • Set goals based on your priorities
  • Set less goals - 1 or 2 at a time, MAX
  • Work on your goals weekly
  • Conduct weekly reviews to evaluate your progress
  • Tell people about your goals - be accountable
  • Reward yourself for every milestone you reach
  • Take time to relax and rejuvenate
  • If you get off track, get right back on!


So, if you're ready to set some goals, here's what you do:

Get out a real pen and a real piece of paper.

Write down everything you accomplished in the last year, big and small.

Write down everything you would like to accomplish in the next year, big and small.

Write down one goal you would like to focus on right now.

Write down one thing you can do this week to get you closer to that goal.

Share your goal with someone and ask them to hold you accountable.

I'll be sharing my own goals here next week!

Thanks for reading!

♡♡♡
Rebecca